To add a custom web page, or set of pages, to the web interface on a Controller, go to the File menu and choose Custom Web Interface.
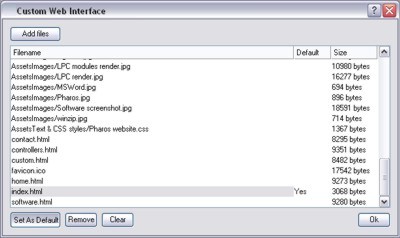
This will open a dialog that shows the files that currently make up your custom web interface:
To add files to the web interface, click Add Files. You will be prompted for a directory that contains the files to add. The contents of the chosen directory will be added to the root of the web interface. If any filenames clash, they will be overwritten. Sub-directories will be recursively added, with the exception of directories called "default", "query" or "trigger", which are reserved names.
Any file type can be included, but since they are stored as part of the project file, be aware that they will take away from space available for programming, and will increase show upload times.
To remove a file, select the file and press Remove.
To remove all files, press Clear.
To pick a default file, select the file and press Set As Default. The default page will be displayed when you browse to http://xxx.xxx.xxx.xxx, where xxx.xxx.xxx.xx is the IP address of the Controller.
Custom web pages can trigger the Controller by creating a hyperlink to "/trigger/xyz", where "xyz" is the trigger number, displayed in the first column of the Triggers management window. Clicking on this hyperlink will fire the numbered trigger, if it exists, but will not cause the page to refresh so there is no need to use Java Script tricks to prevent the page from flickering.
You can capture variables and inject them into the numbered trigger by specifying a "var" field in the query string. The value of this field is expecting a comma-separated list of values, with each value in the format "abc:def" where "abc" is the captured value and "def" is the range of the value (optional). If the value of "abc" is not a number, it is treated as 0. If value of "def" is not a number, it is treated as 255.
For example, the URL "/trigger/1?var=14" will fire trigger number 1 and will inject the value 14. If this trigger had a Start Timeline action that expected a variable to select the timeline, then it would start timeline 14.
In another example, the URL "/trigger/2?var=50:100" will fire trigger number 2 and will inject the value 50. If the variable is used by an action that is expecting a value within a range, for example Set intensity expecting a level between 'off' and 'full', then the injected variable will be treated as 50% since 50:100 = 50%.
You can also inject multiple variables. For example, "/trigger/2?var=50:100,3,4:16" will inject 50 (50%), 3 and 4 (25%).
If you want to inject a string to a variable, for example if you want to set the contents of a text slot, the characters must be bound by double quotes ( " or %22 if using character escaping). To include a " in the injected string you must prefix it with a backslash. To include a backslash, write two backslashes. Here are some examples for injecting strings:
Anything after the closing " and before the next comma is ignored:
If a closing quote is missing, the remaining string is used:
By default, when firing a trigger from a custom web interface, conditions on that trigger will be tested.
To disable this, specify "conditions=0" in the URL query string. For example, "/trigger/1?conditions=0" will fire trigger 1 regardless of whether its conditions are satisfied.
Triggers on the default Control web page will not test conditions.
To provide feedback on a custom web page you can make use of the query interface to access timeline status information, text slot contents, etc.